Sunday, September 10, 2023

Making Handbag With Axis Deer Hide Flap

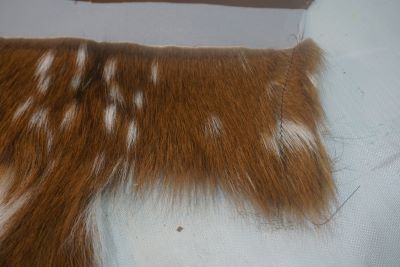
 I used the tail of a Axis Deer hide for the handbag flap.  

CUTTING THE HIDE: 

I started with a different fabric for the base of the bag.  I ended up with dark brown pig skin instead of the fabric in the video.  I hope the deer and the pig will get along.  It was hard to find a color the complimented the hide colors.  

Next I decided on the style of the bag.  I chose a curved bottom instead of the rectangle in the video. Pattern: All Dunn Designs Le Bag.   I enlarged it slightly so it would be the length of the tail.  

I lined the flap by tracing around the back side of the deer hide. Cut the lining (satin) and interfacing adding a 1/4" seam allowance.

With right sides together I stitch around the lining and interfacing leaving the top open.  Clipped curves (I like to use pinking shears) and turned.

The interfacing turned down the outside edge beautifully.   

flap lining

Stitching the lining on the hide was easy, With wrong sides together I stitched it on the machine. Lining side up. 

Brushed the fur out of stitching. 

 Next I stitched the lining for the bottom putting in the pocket sizes I like. When stitching together lining sides, I left an opening at the bottom for turning. 

Inserted tabs with rings at top where I wanted the handles. Added the magnetic snap in the lining (always reinforce under snaps)  

Stitched top of bag with flap right side against pig skin (sandwiched between lining and pig skin).  Turned the bag right side out through the lining opening. 

I made the handle from a gorgeous decorative strap inserting hooks on the end which hooked to the rings.    The bag was finished in no time!   

 Patty Dunn 

Tuesday, March 10, 2020

A special quilt


I was commissioned to be part of a very special quilt.  You may have read my post in May 2018 about a baby quilt made from the dress of Laura McComb.  Here is the link if you would like to read the story.
 https://www.alldunndesigns.com/blogs/news/a-blanket-made-from-a-special-dress
There is a new chapter in this story - one of joy.  Jonathan McComb has married a wonderful woman named Monica.  They are now expecting a baby and those couples how hosted a baby shower for them wanted to all be a part of a keepsake for this new baby coming into their lives.  Each family wrote something special and signed their names on a piece of paper which I had bordered for the size.  Some wrote verses and some made designs, all were unique to each couple or family.  Even the children signed their names.   The families of Jonathan and Monica were also invited to have a square.   Working with my embroidery machine using similar fonts, I digitized the main part of the squares.  I wanted to keep the integrity of their signatures so I traced them on "heat n gone", taped it to the fabric square and followed the signatures with free motion.  Everyone had beautiful things to wish the new baby and we left a square in the middle for Jonathan and Monica to add once the baby is born.  The quilt top was given to them as a surprise at the shower.  I was so honored to be part of this heartfelt gift.

Here are close ups of the squares: 


                                                            Jonathan and Monica   

Watch a video of how I transferred the signatures https://www.youtube.com/watch?v=30zcgmNBbuw


Monday, May 13, 2019

Altering a Prom Dress

This prom dress was purchased online and was 2 sizes to big.

  
  I will show you how I altered it to fit this young lady perfectly.


 About 3" needed to come out of the shoulders.  We pinned it up and I removed lace from where the seam needed to go.  Basted - double checked and then stitched a secure seam.   I cut the seam allowance away to 1/4" from on the back allowance and 1/2" on the front allowance.  I wrapped the extra front seam allowance over the back, hand stitched it down and reapplied the lace to cover seam.


 In the center front the bodice was to wide.  A dart was taken up following the line of the insert.  Later small pieces of lace that were taken off from the shoulder were reapplied to cover the bluntness of the seam in the center.


The back zipper was taken out but only to about 3" from the bottom of the zipper.  I moved it to the pinned location and Stitched it down.  This gave a dart effect and because of the fullness of the skirt all blended in nicely.  This left more at the top but I closed it with a hook and thread loop.

This is how I made the loop cord.

 This is how I inserted the cord to the zipper. Lace was reapplied at the top back to cover the hook.

Visit All Dunn Designs

Saturday, October 22, 2016

Machine Bobbin-work and Fabric Texture


Chat of the Month!  
Using heavy threads in your sewing machine is possible and beautiful!  Thread them on the bobbin and sew on the wrong side of the fabric.
  • Using heavy threads in the bobbin:
  • Wind the bobbin slowly and evenly by holding your finger around the tension disk. 
  • Do not fill bobbin all the way. 

  • Purchase an extra bobbin case.  
  • Loosen the tension screw.
  • Mark the case so you know it is for thicker threads.
  • Slide thread into slot pulling it toward you and then up into the spring.  Be sure bobbin rotates freely - If not pull bobbin out of case and thread it again.  
  • Sew on the WRONG side of the fabric.


  • A 8" X 10" fabric will make a new front for your Cross Talk Cell Carrier. 
  • Steam for texture. 


Project - Cross Talk Cell Carrier - Cross Talk Pattern 1/2 Price


Sunday, April 3, 2016

New Vest!


New Vest PatternApril 2, 2016

My new vest pattern called "The Long and the Short of It" is easy to make and comfortable to wear.  I have made it from all kinds of fabrics from rayon to polyester chiffon.  The easiest is making it from 2 pashmina scarves.  Because the scarf is interesting on both sides,  I made a flat seam so it could be reversible.  Here is the video on how I did the seam.  Make this pattern up in your favorite fabric by April 30, 2016, send me a picture and you will get your name in a drawing for a pair of 10" serrated KIA scissors (valued at $89).  Drawing will happen on May 1st.  


Watch a video of how to lay it out using a scarf. Scarf layout for Vest.   Pattern MD (modifying designers) has other helpful information on fitting redesigning patterns.  Join today.


Sunday, August 12, 2012


I have made a new type of pillow case.  This has a modern look for a great gift.   I now have posted the instructions with the template on my website AND a video making the case from start to finish on youtube - all FREE!  A Mod Case
By the way I like the polyester satin at Hobby Lobby the best.  They have lots of bright modern colors too!

Sunday, July 29, 2012

Sewing room help


CLOSED AND BEFORE I FOUND ALL THE HOOKS 
What to do with all the thread when you have an embroidery machine.  I bought a software for my embroidery machine.  I got a wonderful deal - a whole box of FREE thread.  Nice BUT what do you do with 100 spools of thread! First I left them in the box and was constantly digging through it looking for the color I needed.   I remembered when I had my kitchen remodel they put sliding drawers in.  So off to  the hardware store I went and there they were!  I cut the pegboard to fit the inside wall of the sewing machine table. It is 24" deep.


 I mounted it with DRAWER slides so it will pull in and out.  The hardest thing?  Finding enough hooks that were the same!  It took 3 different stores and I took ALL of them!